Ready for a treat that’s both easy and fun? Chocolate Covered Banana Pops are the perfect snack for kids and adults alike. With just a few ingredients like ripe bananas and dark chocolate, you can create a delightful dessert that’s sure to impress. Follow my simple steps, and you’ll be munching on these delicious pops in no time. Let’s dive into the sweet world of chocolate-covered goodness!
Why I Love This Recipe
- Quick and Easy: This recipe requires minimal prep time and can be whipped up in just 15 minutes, making it perfect for a last-minute treat!
- Healthy Indulgence: With bananas as the base, these pops are a healthier alternative to typical desserts while still satisfying your sweet tooth.
- Customizable Toppings: Feel free to mix and match toppings like nuts, shredded coconut, or even sprinkles to make each pop uniquely yours!
- Fun for All Ages: These chocolate-covered banana pops are a hit with kids and adults alike, making them an excellent choice for parties or family gatherings.
Ingredients
Main Ingredients
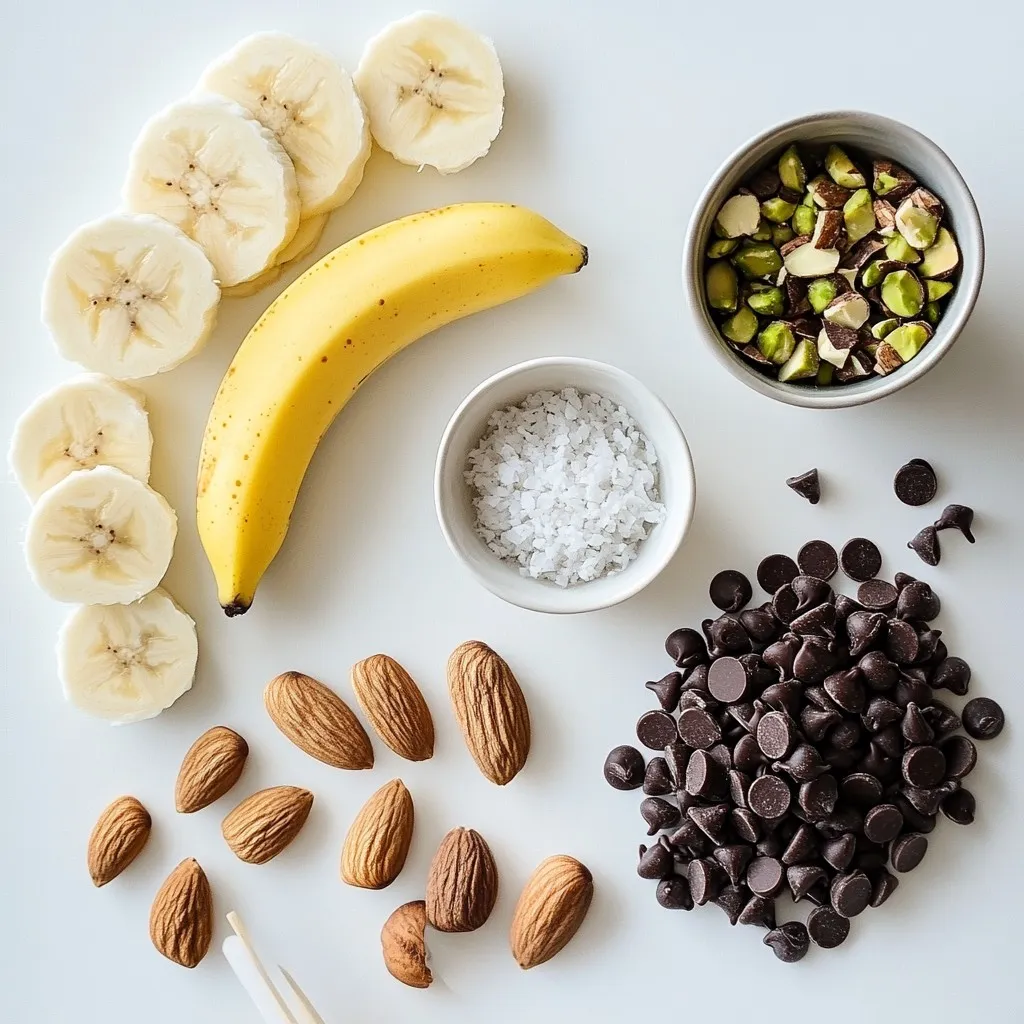
– 3 ripe bananas
– 1 cup dark chocolate chips
– 1 tablespoon coconut oil
Toppings
– 1/4 cup chopped nuts (almonds or pistachios)
– 1/4 cup unsweetened shredded coconut
– 1/4 teaspoon sea salt
Equipment Required
– 6 popsicle sticks or skewers
– Baking tray
– Parchment paper
– Microwave-safe bowl
The first step is the main ingredients. You need ripe bananas, dark chocolate chips, and coconut oil. Ripe bananas are sweet and easy to work with. Use dark chocolate chips for a rich flavor. The coconut oil helps the chocolate melt smoothly.
Next, let’s talk about toppings. Chopped nuts like almonds or pistachios add crunch and flavor. Unsweetened shredded coconut gives a tropical twist. A sprinkle of sea salt enhances the taste, making it more exciting.
You also need some simple equipment. Popsicle sticks or skewers help you hold the banana pops. A baking tray with parchment paper keeps everything clean. A microwave-safe bowl is essential for melting the chocolate.
With these ingredients and tools ready, you are set to make your treats!
Step-by-Step Instructions
Preparing the Bananas
Start by peeling the bananas. Use three ripe bananas for the best flavor. Slice each banana into thirds. Each piece should be a good size for popping into your mouth. Next, take a popsicle stick. Insert it into each banana piece. Make sure the stick is centered. This helps you hold the pop easily.
Freezing the Banana Pops
Now, grab a baking tray. Line it with parchment paper to prevent sticking. Lay out the banana pops on the tray. Leave some space between each pop. This will help them freeze evenly. Place the tray in the freezer. Let the banana pieces freeze for about 30 minutes. They should feel firm to the touch when ready.
Making the Chocolate Coating
While the bananas freeze, prepare the chocolate coating. In a microwave-safe bowl, add one cup of dark chocolate chips. Then, add one tablespoon of coconut oil. The oil helps the chocolate melt smoother. Microwave the mixture. Start with 30 seconds, then stir. Repeat this until the chocolate is fully melted. You want a smooth consistency for dipping.
Coating the Banana Pops
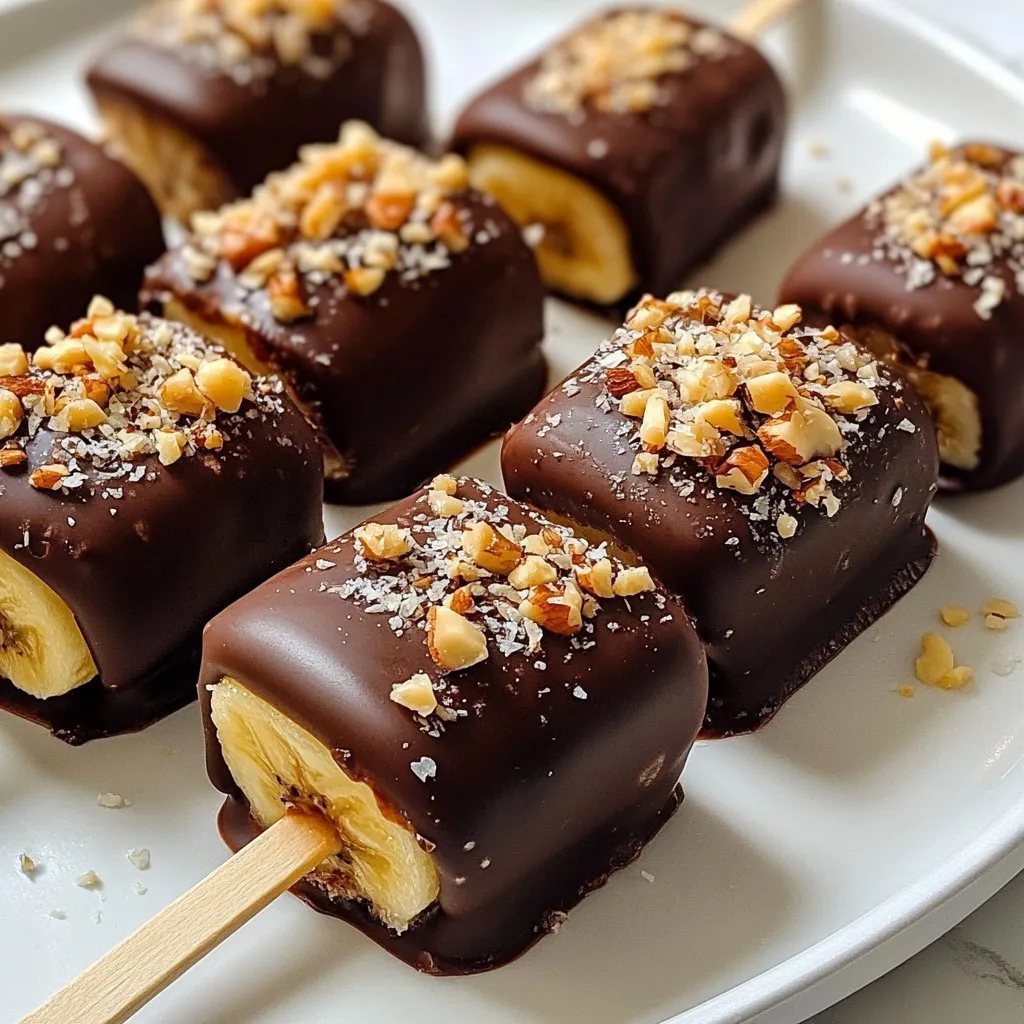
Once the bananas are frozen, take them out of the freezer. Dip each banana pop into the melted chocolate. Make sure each piece is coated well on all sides. Quickly add toppings before the chocolate sets. You can sprinkle chopped nuts or shredded coconut on top. Press the toppings gently into the chocolate to help them stick.
Final Freezing
Now, put the coated banana pops back on the tray. For a fun touch, drizzle any leftover melted chocolate over the pops. This makes them look fancy! Return the tray to the freezer. Let the chocolate harden for about 30 minutes. When done, the pops will be ready to enjoy.
Tips & Tricks
Achieving Perfect Chocolate Coating
To get a smooth chocolate layer, start with good chocolate. Use dark chocolate chips for rich taste. Add one tablespoon of coconut oil. This will help the chocolate coat better.
For an even coat, dip each banana pop straight down into the chocolate. Twist it a bit as you pull it out. This helps the chocolate cover all sides. If you notice thick spots, gently tap the stick against the bowl.
You can melt chocolate in a double boiler too. Just fill a pot with water and let it simmer. Place a heat-safe bowl on top, then add the chocolate and oil. Stir until smooth. This method gives you better control over the heat.
Storing Leftover Ingredients
If you have extra bananas, keep them in the fridge. They will last longer and stay fresh. Just remember, they will turn brown. This won’t affect taste but may change looks.
For leftover chocolate, store it in an airtight container. Keep it at room temperature or in the fridge. If you plan to use it soon, the fridge is fine. If not, freeze it for later.
Presentation Tips
Serve your banana pops on a bright platter. This makes them stand out. Add a pinch of sea salt on top for a gourmet touch. It gives a nice contrast to the sweetness.
Consider using colorful fruit skewers to hold the pops. This adds fun and flair to your display. You can also drizzle leftover chocolate over the pops in a zigzag. It adds a special look and makes them even more tempting!
Pro Tips
- Choose the Right Bananas: Ensure your bananas are ripe but not overripe for the best flavor and texture. They should be slightly freckled for natural sweetness.
- Optimal Chocolate Melting: Use a microwave-safe bowl and melt the chocolate in short intervals to prevent burning. Stir well to achieve a smooth consistency.
- Customize Your Toppings: Experiment with different toppings like crushed cookies, sprinkles, or dried fruits to create unique flavor combinations.
- Serving Suggestions: For a fun presentation, serve the banana pops in a mason jar or stand them upright in a piece of foam or a cut fruit to keep them upright.
Variations
Nut-Free Options
If you need a nut-free treat, seeds work great. Try sunflower or pumpkin seeds instead. These add crunch and flavor without the nuts. You can also use toppings like:
– Mini chocolate chips
– Sprinkles
– Crushed graham crackers
These options keep your banana pops safe for everyone.
Flavor Variations
You can change the chocolate to suit your taste. Milk chocolate offers a sweeter option. White chocolate adds a creamy touch.
Want to add a twist? Flavor your chocolate! Add a few drops of vanilla, mint, or almond extract. This creates a unique taste in every bite.
Seasonal Themes
Make your banana pops festive! For holidays, use fun toppings. Try colored sprinkles for birthdays. Use red and green for Christmas.
Freeze-dried fruits are another fun option. They add a pop of color and taste. Consider strawberries, raspberries, or even mango. These fruits bring a new level of excitement to your treat!
Storage Info
Storing Chocolate Covered Banana Pops
You can store chocolate-covered banana pops in different ways. Freezing is best for long-term storage. They can last up to two months in the freezer. If you choose to refrigerate them, they will stay fresh for about three days. Use an airtight container to keep them safe and tasty.
Reheating and Enjoyment
If you want to enjoy the pops again, you do not need to reheat them. Just take them out of the freezer. Let them sit for a few minutes at room temperature. This will soften the chocolate a bit. If you must melt the chocolate again, use the microwave. Heat it in short bursts of 10 to 15 seconds. Stir after each burst until smooth.
Signs of Spoilage
Check the banana pops before you eat them. If you see any ice crystals, they may be freezer burned. A change in color, like browning, means they are past their prime. If they smell off or look slimy, do not eat them. Fresh banana pops should look bright and taste sweet.
FAQs
How long do chocolate-covered banana pops last in the freezer?
Chocolate-covered banana pops can last up to two months in the freezer. To keep them fresh, store them in an airtight container. Label the container with the date, so you remember when you made them. This way, you can enjoy them at their best!
Can I use other fruits for this recipe?
Yes, you can use other fruits! Strawberries, pineapple pieces, or apple slices work great. Just make sure the fruit is firm enough to hold the popsicle stick. You can even mix fruits for a fun variety!
Is this recipe suitable for vegans?
To make this recipe vegan, use dairy-free chocolate chips. You can find many great options at the store. The rest of the ingredients are already plant-based, so you can enjoy this treat without worry!
Can I store the chocolate-covered banana pops at room temperature?
It’s best to store chocolate-covered banana pops in the freezer. If left at room temperature, they may melt and become messy. If you need to serve them, let them sit out for a few minutes before serving. This will soften them a bit without melting.
Now you know how to make delicious chocolate-covered banana pops. With ripe bananas, dark chocolate, and fun toppings, these treats are easy to create and enjoy. You learned step-by-step how to prepare, freeze, and coat the pops perfectly. Remember to experiment with different flavors and toppings. Store them well for long-lasting enjoyment. Keep these tips in mind, and you’ll impress friends and family with a fun, tasty snack! Enjoy every bite of your creatio