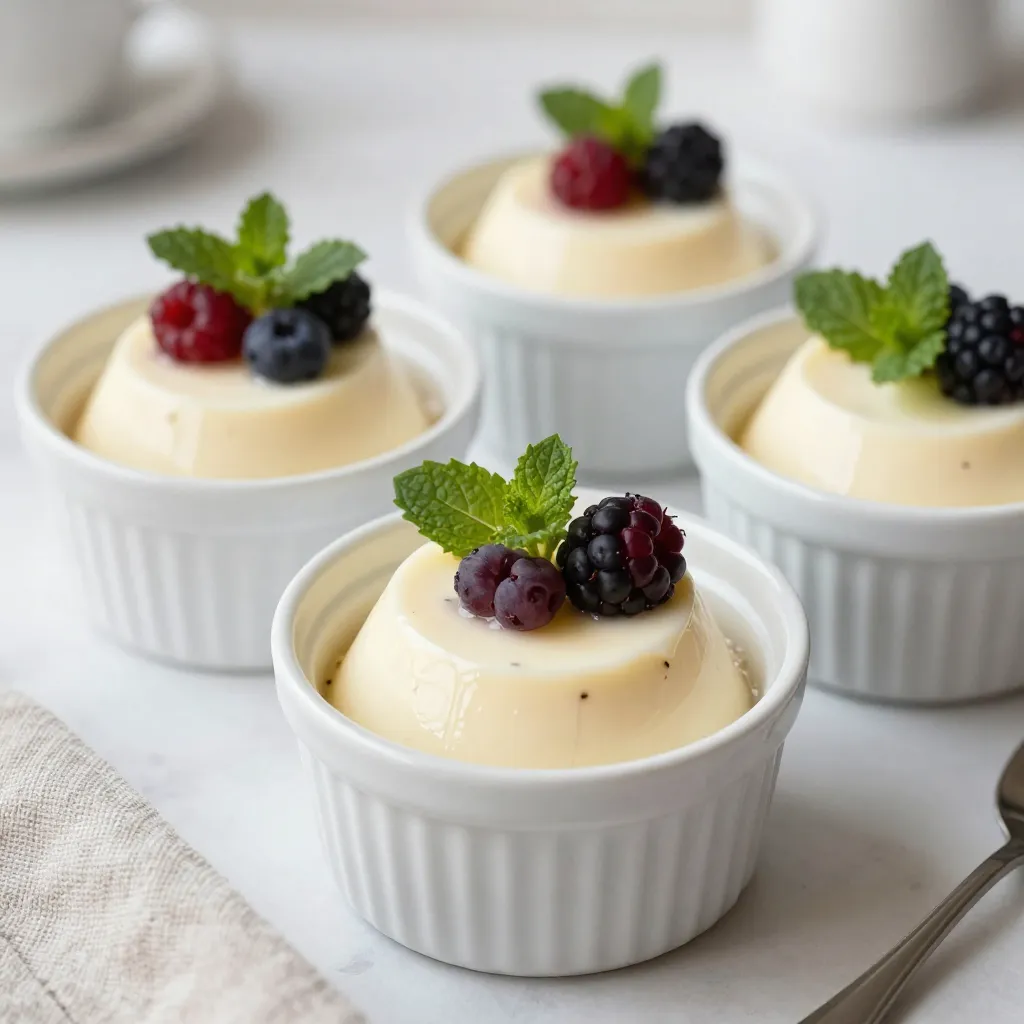
Are you ready to impress your friends with a stunning dessert? Vanilla Bean Panna Cotta is not only simple to make but also packed with rich flavor. With just a few ingredients, like heavy cream and pure vanilla, you can create a creamy delight that will leave everyone wanting more. Follow my easy steps to achieve that perfect texture and wow your guests! Let’s dive into this delicious treat together.
Why I Love This Recipe
- Decadent Creaminess: This panna cotta has a rich and velvety texture that melts in your mouth, making it an indulgent treat.
- Simple Ingredients: With just a handful of basic ingredients, this recipe is easy to whip up, perfect for any skill level.
- Versatile Flavor: The classic vanilla flavor can be paired with various toppings, allowing for creative presentations.
- Impressive Presentation: Whether served in ramekins or glasses, this dessert always looks elegant and sophisticated.
Ingredients
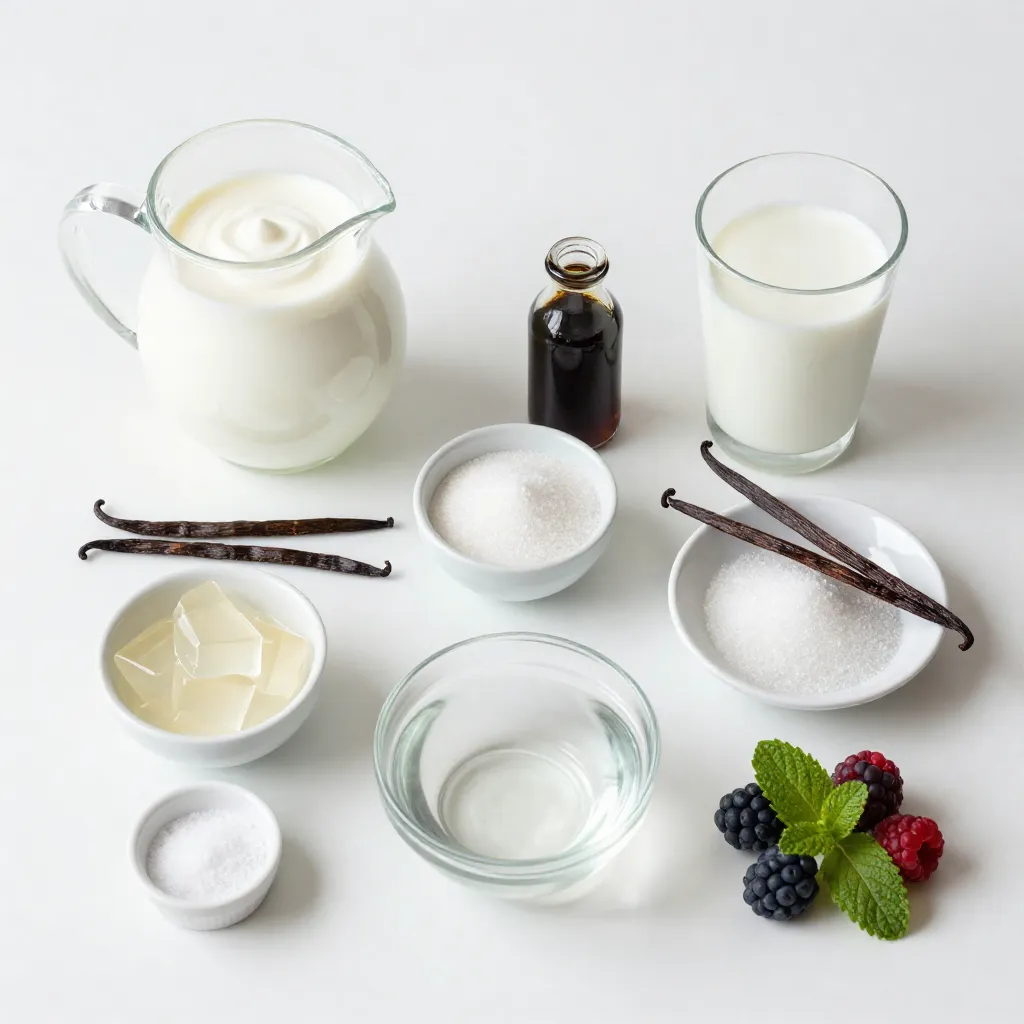
Main Ingredients
– 2 cups heavy cream
– 1 cup whole milk
– 1/2 cup granulated sugar
Heavy cream makes the panna cotta rich and smooth. Whole milk adds a light texture. Granulated sugar sweetens the dessert just right.
Flavor Enhancers
– 2 teaspoons pure vanilla extract
– 1 vanilla bean, split lengthwise with seeds scraped
Pure vanilla extract brings out the sweet flavor. The vanilla bean gives a deeper taste. Using both makes the panna cotta extra special.
Gelatin and Additional Components
– 2 1/2 teaspoons powdered gelatin
– 3 tablespoons cold water
– Pinch of salt
Powdered gelatin helps the panna cotta set properly. Cold water blooms the gelatin for the right texture. A pinch of salt enhances all the flavors.
Step-by-Step Instructions
Blooming the Gelatin
To bloom the gelatin, start by taking a small bowl. Sprinkle the powdered gelatin over 3 tablespoons of cold water. Let it sit for about 5 minutes. This allows the gelatin to absorb the water and swell up. Blooming is key to a smooth texture. It helps the gelatin dissolve evenly in the hot mixture.
Combining and Heating Ingredients
Next, take a medium saucepan. Pour in 2 cups of heavy cream, 1 cup of whole milk, and 1/2 cup of granulated sugar. Add in 2 teaspoons of pure vanilla extract and the seeds from the split vanilla bean. Don’t forget to add the split pod too for extra flavor. Place the saucepan on medium heat. Stir gently until the sugar dissolves completely. Watch closely as you heat it. You want it to simmer, not boil.
Final Preparation
Once the mixture is hot, remove the saucepan from the heat. Stir in the bloomed gelatin mixture. Mix until it dissolves completely, with no clumps left. To keep your panna cotta smooth, strain the mixture through a fine mesh sieve into a large bowl. This step removes the vanilla bean pod and any undissolved gelatin pieces. Now, carefully pour the silky mixture into ramekins or serving glasses. Let them cool at room temperature for a bit. After that, cover each ramekin with plastic wrap. Refrigerate for at least 4 hours, or until set firmly.
Tips & Tricks
Achieving Perfect Texture
To make smooth panna cotta, focus on these key factors:
– Use fresh ingredients. Fresh cream and milk improve texture and taste.
– Bloom the gelatin well. This step is crucial for a creamy finish.
– Heat gently. Avoid boiling the mixture to keep a silky texture.
If your panna cotta does not set well, check these common issues:
– Too little gelatin can lead to a runny dessert.
– Overheating can ruin the cream. Keep it below boiling.
– Make sure to strain the mixture. This removes lumps and ensures smoothness.
Serving Suggestions
For an elegant dessert presentation, consider these tips:
– Use clear glasses or ramekins to show off the panna cotta’s creamy layers.
– Layer assorted fresh berries on top for color and flavor.
– Drizzle a fruity coulis made from blended berries for a pop of taste.
Ideal garnishes include:
– Fresh strawberries, blueberries, or raspberries for sweetness.
– Mint leaves to add a touch of green and freshness.
Time-Saving Tips
If you’re busy, here are some prep and chill tips:
– Make panna cotta a day ahead. It’s perfect for gatherings.
– While the panna cotta chills, prep your garnishes. This saves time later.
– Keep everything in the fridge until ready to serve.
For make-ahead recommendations:
– Store panna cotta in the fridge for up to three days.
– If you need to, you can freeze it. Just let it thaw in the fridge before serving.
Pro Tips
- Use Fresh Ingredients: For the best flavor in your panna cotta, always opt for fresh cream and high-quality vanilla extract. Fresh ingredients can significantly enhance the overall taste of the dessert.
- Chill Thoroughly: Make sure to chill your panna cotta for at least 4 hours. This allows it to set properly and develop a smooth, creamy texture. For best results, chill it overnight.
- Experiment with Flavors: While vanilla is classic, feel free to experiment with other flavors like coffee, chocolate, or citrus. Just replace the vanilla extract with your desired flavoring to create a unique dessert.
- Presentation Matters: Enhance the visual appeal by serving the panna cotta in elegant glassware and garnishing with colorful fruits or edible flowers. This transforms a simple dessert into a stunning centerpiece.
Variations
Flavor Variations
You can make panna cotta more exciting with different flavors. For a chocolate panna cotta, melt semi-sweet chocolate into the cream mixture. This adds a rich taste. Use about 4 ounces of chocolate for a nice balance. Stir it in right after you heat the cream and sugar.
Fruit-infused panna cotta is also a great option. You can blend fresh fruits like strawberries or mangoes into the cream. Strain the mixture to remove any bits. This gives a fresh and fruity twist. Try adding a layer of pureed fruit on top for extra fun.
Dietary Adjustments
If you need a dairy-free panna cotta, use coconut milk instead of cream and milk. This will still give you that creamy texture. Almond milk is another option. Just remember to adjust the sugar, as some non-dairy milks are sweeter.
For low-sugar or vegan versions, substitute the sugar with a sweetener like maple syrup. Use agar-agar instead of gelatin for a vegan option. Agar-agar works well if you follow the right instructions. This keeps the panna cotta set without any animal products.
Creative Serving Ideas
Serving panna cotta can be fun and creative. Layer it with fresh fruit or sauces. Berries or a berry coulis look stunning on top. They add color and flavor. You can also serve panna cotta in different glassware, like small jars or cups. This makes each dessert feel special.
For an added touch, use a squeeze bottle to drizzle sauces over the panna cotta. This gives a fancy look and lets guests enjoy different flavors. You can even stack different flavors in one glass for a unique dessert experience.
Storage Info
Proper Storage Techniques
To store leftover panna cotta, cover each ramekin with plastic wrap. This keeps the dessert fresh and prevents it from absorbing odors. You can also place the panna cotta in an airtight container. Choose containers that fit well to avoid excess air.
Freezing Instructions
Panna cotta can be frozen, but it may change in texture. To freeze it safely, allow the panna cotta to set completely in the fridge. Once set, wrap each ramekin tightly with plastic wrap. For best results, place them in a freezer bag.
When you are ready to enjoy it, thaw the panna cotta in the fridge overnight. Avoid thawing at room temperature, as it may become too soft.
Shelf Life
Panna cotta lasts in the fridge for about 5 days. Keep an eye out for signs of spoilage, such as an off smell or a change in texture. If it looks grainy or has an unusual color, it’s best to throw it away. Store it properly to enjoy this creamy delight for as long as possible!
FAQs
What is panna cotta?
Panna cotta is a classic Italian dessert. It is a creamy treat made from sweetened cream thickened with gelatin. The name means “cooked cream” in Italian. This dessert has a smooth and silky texture. You can serve it plain or with toppings like fruit or sauces. It’s simple to make and looks elegant on any table.
Can I use powdered gelatin instead of sheets?
Yes, you can use powdered gelatin as a substitute for sheets. However, you need to adjust the amount used. For each sheet, you use about 1 teaspoon of powdered gelatin. Bloom the powdered gelatin in cold water before adding it to the warm cream mixture. This helps ensure it dissolves properly for a smooth panna cotta.
How do I know when panna cotta is set?
You can tell panna cotta is set when it feels firm to the touch. Gently shake the ramekin; it should jiggle slightly but not be liquid. It usually takes about 4 hours in the fridge for panna cotta to set. If you want to check, use a toothpick; insert it into the panna cotta, and it should come out clean.
This article covered how to make panna cotta from start to finish. We explored the key ingredients like heavy cream and gelatin, plus how to blend and heat them. You learned tips for a smooth texture, serving ideas, and even variations for diet needs.
Panna cotta is fun and easy to make. With these steps, you can create a tasty treat that impresses. Now, you can enjoy this classic dessert at home or share it with friends. Keep experimenting and have fun in the kitche